
https://www.newline.co/courses/building-advanced-admin-reporting-in-react
Hey Carlos, it’s Nate from newline and today we’ll build an admin dashboard with React and React Query Builder. Admin reporting is all about giving business users an easy interface for interacting with our databases. This topic will be especially relevant for you if you work in a large company where business users want to run quick queries on a database.
I’ll show you:
- how to import React Query Builder
- how to build your first querying dashboard
- how to structure queries
- what the query output looks like in SQL
Why We Need React Query Builder
Business users need an easy way to query databases such as PostgreSQL or MongoDB. Unfortunately, admin tools like pgAdmin are more suited to developers, not non-technical people. This is why we use a library like React Query Builder to develop flexible interfaces for users to query their databases.
Admin Reporting
Set Up The Client-Side Application
To get started, let’s scaffold a basic React project with the Create React App and TypeScript boilerplate template.
$ npx create-react-app <project-name>\
--template typescript
Inside this project’s root directory, install the react-querybuilder package.
$ npm install --save react-querybuilder
Set Up The Server-Side Application
React Query Builder creates a query from the rules set within the query builder interface. This query is transmitted to a server-side application that’s connected to a database. The server forms a SQL statement from the query, executes the SQL, and returns the data.
Our server is an Express.js API running within a multi-container Docker application. This application also runs a PostgreSQL database and pgAdmin in separate containers.
Clone the following repository: https://github.com/newline-sandbox/nyc-squirrel-census-api.
$ git clone \
https://github.com/newline-sandbox/nyc-\
squirrel-census-api.git
Within this cloned project, add a .env.development file with the following environment variables.
# Environment Variables for the
# Express.js API
NYCSC_API_PORT=8080
NYCSC_API_CLIENT_APP_URL=
 http://localhost:3000

# Environment Variables for the
# PostgreSQL Database
NYCSC_PG_DB=nyc_squirrels
NYCSC_PG_DB_USER=postgres_user
NYCSC_PG_DB_PASSWORD=postgres_password

# Environment Variables for pgAdmin
NYCSC_PGADMIN_EMAIL=
 emailaddress@service.com
NYCSC_PGADMIN_PASSWORD=pgadmin_password
To run the server-side application, execute the following.
$ export DOCKER_COMPOSE_ENV_FILE\
=./.env.development
Followed by:
$ docker-compose --env-file\
$DOCKER_COMPOSE_ENV_FILE build\
--force-rm --no-cache && docker-compose\
--env-file $DOCKER_COMPOSE_ENV_FILE up\
--detach && docker-compose --env-file\
$DOCKER_COMPOSE_ENV_FILE logs --follow
This starts the server-side application.
The PostgreSQL database contains a single table named cp_squirrels that is seeded with 2018 Central Park Squirrel Census data downloaded from the NYC Open Data portal. Each record represents a sighting of an Eastern gray squirrel in New York City’s Central Park in the year 2018.
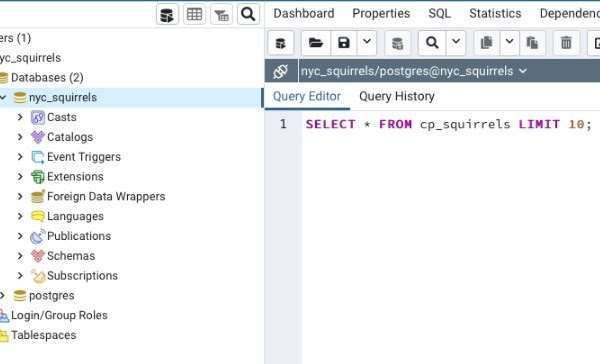
Let’s verify that pgAdmin is running by visiting localhost:5050 in the browser. Enter your credentials (NYCSC_PGADMIN_EMAIL and NYCSC_PGADMIN_PASSWORD) into the log-in form. On the pgAdmin welcome page, right-click on “Servers” in the “Browser” tree control (in the left pane) and in the dropdown, click Create > Server.
Under “General,” set the server name to nyc_squirrels. Under “Connection,” set the host name to nycsc-pg-db. Set the username and password to the values of NYCSC_PGADMIN_EMAIL and NYCSC_PGADMIN_PASSWORD respectively.
Save those server configurations. Wait for pgAdmin to connect to the PostgreSQL database. Once connected, the database appears under the “Browser” tree control.
Right-click on the database (nyc_squirrels) in the “Browser” tree control and, in the dropdown, click the Query Tool option. In the query editor, type a simple SQL statement to verify that the database has been properly seeded.
SELECT * FROM cp_squirrels LIMIT 10;
This statement returns the first ten records from the cp_squirrels table.
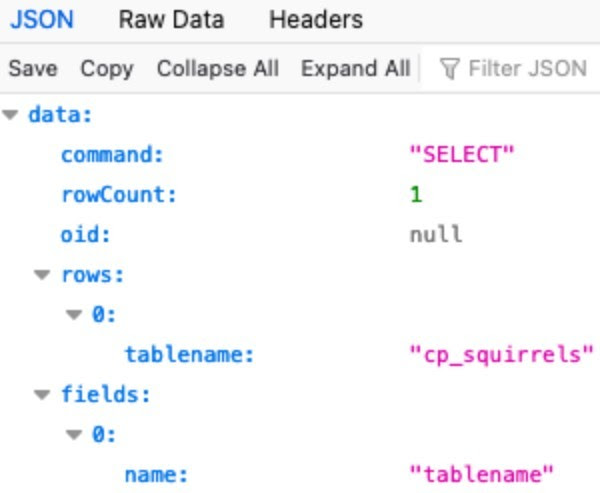
Let’s verify that the Express.js API is running by visiting localhost:8080/tables in the browser. The browser should display information about the tables available in our PostgreSQL database. In this case, our database contains a single table: cp_squirrels.
With the server-side set up properly, let’s now integrate the React Query Builder component into the client-side application.
Configure React Query Builder In our Create React App project’s src/App.tsx file, let’s import the QueryBuilder component from the React Query Builder library to create a basic query builder.
import React from "react";
import "./App.css";
import QueryBuilder
from "react-querybuilder";

const fields = [
  { name: "x", label: "X" },
  { name: "y", label: "Y" },
  { name: "hectare", label: "Hectare" },
  { name: "shift", label: "Shift" },
  { name: "obs_date", label: "Date" },
  { name: "age", label: "Age" },
  {
    name: "primary_fur_color",
    label: "Fur Color",
  },
  {
    name: "obs_location",
    label: "Location",
  },
];

const logQuery = (query) => {
  console.log(query);
};

const App = () => (
  <QueryBuilder
    fields={fields}
    onQueryChange={logQuery}
  />
);

export default App;
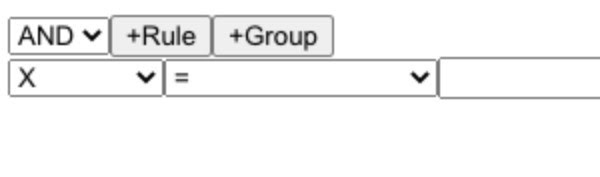
Open the application within your browser. The following three element component is shown in the browser:
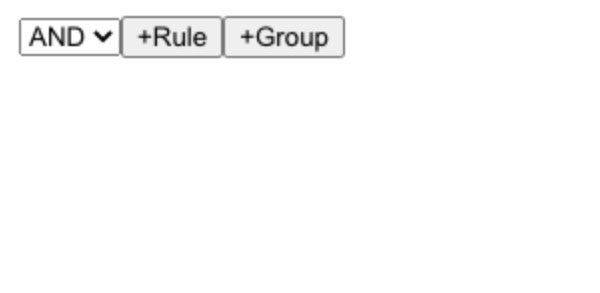
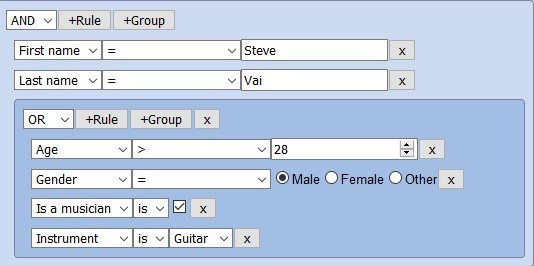
The first element is the combinator selector. The second element is the add rule action. Press this button to render a new rule beneath the initial query builder component.
A rule has a field, an operator and a value editor, and it corresponds to a condition specified in a SQL statement’s WHERE clause. For example, if we type -73.9561344937861 into the input field, then the condition that will be specified in the WHERE clause is X = -73.9561344937861. Basically, this will fetch all squirrel sightings located at the longitudinal value of -73.9561344937861.
If we press the add rule action button again, another rule appears.
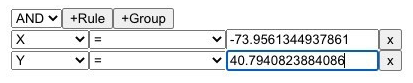
With two rules, two conditions are specified. They are joined by the AND operator: X = -73.9561344937861 AND Y = 40.7940823884086.
The third element is the add group action. This adds a new group of rules.
Initially, there are no rules within the newly created group. Let’s add two new rules to this group by pressing its add rule action button twice. Then change the value of its combinator selector to OR.

The two rules within this new group are combined together. This means that the overall condition in our query is now X = -73.9561344937861 AND Y = 40.7940823884086 AND (X = -73.9688574691102 OR Y = 40.7837825208444).
User interaction with the query builder runs the logQuery function, which prints the query to the console.
Now let’s import the formatQuery function from the react-querybuilder library and call it inside logQuery with the query. This allows us to format the query as a SQL WHERE clause.
// src/App.tsx
// ...
import QueryBuilder, {
  formatQuery,
} from "react-querybuilder";
// ...
const logQuery = (query) => {
  console.log(query);
  console.log(
    formatQuery(query, "sql")
  );
};
// … If we modify the controls’ values, then both the query and its formatted string print to the console.
Getting Data From The Database To get records from the database, we send the query to our Express.js API to fetch data from our PostgreSQL database. The query builder produces the queries for us, then our backend app executes them on the database and returns the data.
That completes the essential workflow you’ll use for creating user friendly admin dashboards. However, there’s a lot more you can do to make your admin dashboards more useful for end users. For instance, you can add analytic maps and charts, something I’ll show you in an upcoming email.
Till next time.
– Nate
https://newline.co